I was halfway through a frantic Sunday brunch, juggling a pot of coffee, a stack of pancakes, and a broken toaster, when I realized my biscuits had turned into a sad, flat disappointment. The dough had been overmixed, the butter had been left in the fridge too long, and the oven had been preheated to the wrong temperature. I stared at that soggy batch, feeling the weight of a kitchen disaster that could have been avoided with a simple tweak. I swore then, right there on my counter, that I would never let a biscuit ruin a morning again.
Fast forward to a Saturday morning that smelled like fresh butter and vanilla, the air thick with anticipation. The kitchen light cast golden shadows over a bowl of flour, a splash of milk, and a generous swirl of melted butter, each ingredient gleaming like a promise of flavor. The sound of the whisk tapping against the bowl was a metronome, a steady beat that kept my nerves from fraying. I could almost taste the buttery sheen that would soon coat each biscuit, a glossy finish that would make even the most cynical foodie swoon.
What makes this version of Breakfast Butter Swim Biscuits stand out is that it’s not just about the taste; it’s about the experience. The biscuits rise like a gentle tide, the butter glaze drips like liquid gold, and the crust crackles with a satisfying snap that feels like a triumph. The recipe is so simple that even a novice can master it, yet it’s layered with subtle nuances that seasoned bakers will appreciate. I dare you to taste this and not go back for seconds; the buttery richness will have you begging for more.
I’ve spent countless hours tweaking ratios, experimenting with temperatures, and testing variations until I found this exact blend of ingredients that delivers a biscuit that is both airy and indulgently buttery. Picture yourself pulling a golden batch from the oven, the whole kitchen smelling incredible, and then watching the butter swim across the surface like a slow‑motion waterfall. That visual alone should convince you that this is hands down the best version you’ll ever make at home. Let me walk you through every single step — by the end, you’ll wonder how you ever made it any other way.
What Makes This Version Stand Out
- Flavor: The subtle sweetness from sugar balances the savory notes of butter, creating a complex flavor profile that sings with every bite. The gentle hint of salt amplifies the richness without overpowering the delicate crumb.
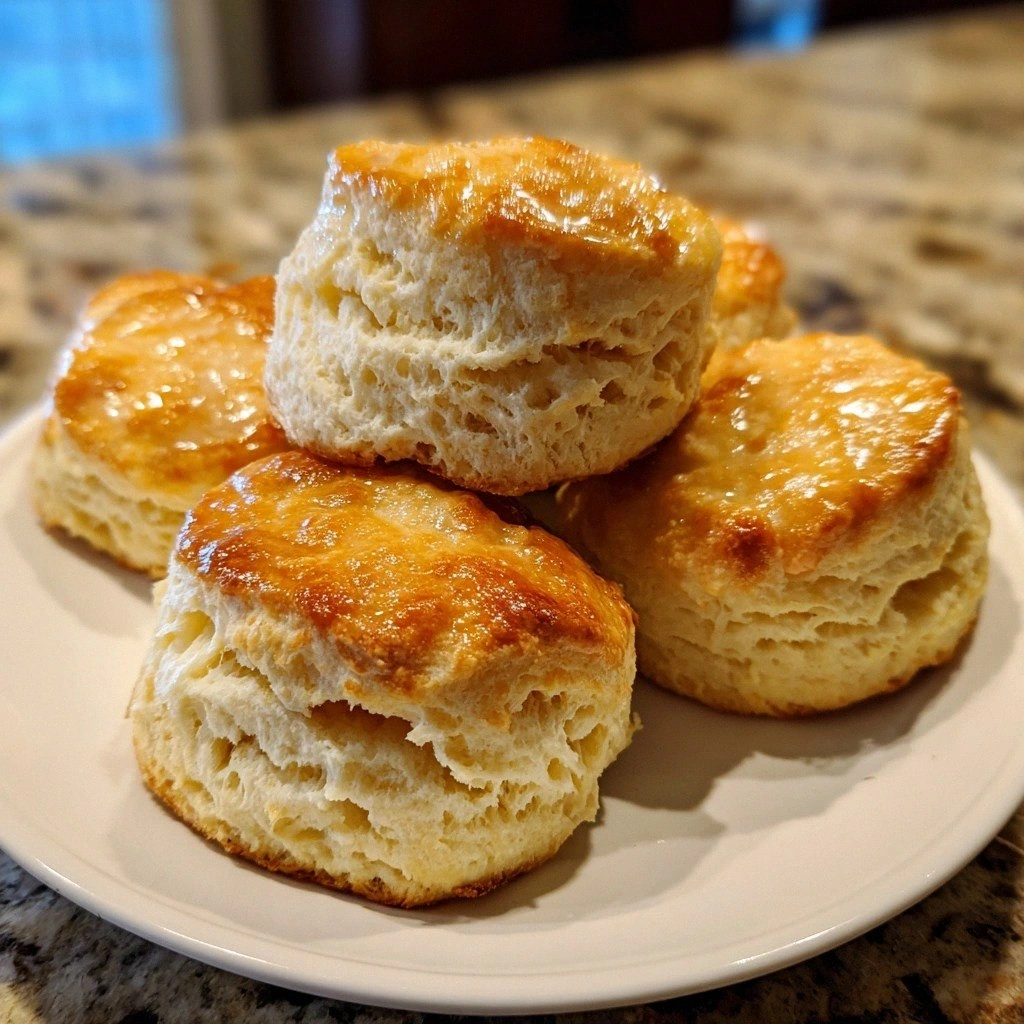
- Texture: A tender, fluffy interior paired with a crisp, golden crust that crackles when you bite into it. The butter glaze adds a velvety sheen that makes each biscuit feel like a luxury treat.
- Simplicity: No fancy equipment or obscure ingredients required. A whisk, a mixing bowl, and a standard oven are all you need to produce bakery‑quality biscuits.
- Uniqueness: The “butter swim” technique gives the biscuits a signature look and mouthfeel that sets them apart from ordinary breakfast biscuits.
- Crowd Reaction: Friends and family rave about the buttery sheen and airy texture. It’s the kind of dish that turns a casual gathering into a memorable breakfast event.
- Ingredient Quality: Using real butter and fresh milk ensures a depth of flavor that artificial substitutes can’t match. The quality of the flour also determines the lightness of the crumb.
- Cooking Method: A quick, no‑fuss method that keeps the biscuits moist without becoming soggy, thanks to the precise timing and temperature control.
- Make‑Ahead Potential: You can bake a batch and reheat them later without sacrificing texture or flavor. The butter glaze also helps keep them moist during storage.
Inside the Ingredient List
The Flavor Base
All-purpose flour is the backbone of any biscuit, it gives structure and a light texture. It’s the canvas that holds everything together, allowing the butter to coat the dough and the baking powder to create lift. If you use cake flour instead, the biscuits will be softer but may collapse; if you use bread flour, they’ll be chewier and less tender. Choosing the right flour is essential for achieving the perfect crumb.
The Texture Crew
Baking powder is this little magic powder that helps the biscuits rise, making them fluffy and airy. A pinch of baking soda can also help, but be careful not to overdo it, or you’ll end up with a soapy aftertaste. The milk moistens the dough and contributes to a tender biscuit; whole milk gives richer flavor, while skim or non‑dairy alternatives can lighten the profile. The butter is the star of the show! Melted butter not only adds rich flavor but also creates that delightful swimming effect.
The Unexpected Star
Sugar adds a touch of sweetness; feel free to adjust based on your taste preferences. A tablespoon of sugar is enough to provide a subtle glaze without turning the biscuits into sweet pastries. If you prefer a savory biscuit, simply omit the sugar or replace it with a pinch of smoked salt for a different flavor dimension. Remember, sugar also helps in browning, giving the biscuits a beautiful golden hue.
The Final Flourish
Salt: Just a pinch enhances the flavors and balances the sweetness. It’s a subtle but crucial element that brings all the flavors together. If you use too much salt, the biscuits can taste overly salty; too little, and they’ll taste flat. A good rule of thumb is one teaspoon of salt per two cups of flour for this recipe.
Everything’s prepped? Good. Let’s get into the real action…
The Method — Step by Step
- Preheat and Prep: Set your oven to 425°F (220°C) and line a baking sheet with parchment paper. The high temperature is key to creating a crisp crust while keeping the interior airy. While the oven heats, measure out 2 cups of all-purpose flour, 2 teaspoons of baking powder, 1 teaspoon of salt, and 1 tablespoon of sugar into a large bowl. This is the foundation of our biscuit dough.
- Butter Melt: In a small saucepan, melt 4 tablespoons of butter over low heat until it’s just liquid. Watch it closely; if it starts to brown, it’s overcooked. The goal is a clear, golden liquid that will coat the biscuits like a waterfall. Keep it warm and set aside for later use.
- Combine Dry Ingredients: Whisk the flour, baking powder, salt, and sugar together until fully blended. This ensures even distribution of leavening agents and flavor. The mixture should feel light and airy, like a fine dusting of sugar. Any lumps will affect the rise.
- Incorporate Milk: Pour 1 cup of milk into the dry mixture and stir gently with a wooden spoon until just combined. The dough will be slightly sticky; that’s normal. Avoid overmixing, or the gluten will develop and the biscuits will become tough. The goal is a cohesive, soft dough.
- First Butter Swell: Fold in 2 tablespoons of the melted butter into the dough, using a gentle folding motion. This creates a subtle swirl of butter within the biscuit, which will later melt into a glossy glaze. The dough should feel slightly tacky but not greasy.
- Shape the Biscuits: Turn the dough onto a floured surface and gently pat it into a 1-inch thick rectangle. Using a 2.5-inch biscuit cutter, cut out rounds, pressing straight down to avoid tearing. Place each biscuit on the prepared baking sheet, spacing them about 2 inches apart. The spacing allows steam to escape and the biscuits to rise evenly.
- Second Butter Glaze: Brush the tops of each biscuit with the remaining 2 tablespoons of melted butter. This second coating ensures a shiny, buttery finish that will melt into a silky glaze as they bake. Don’t be shy; a generous brush will make the biscuits look irresistible.
- Bake to Perfection: Slide the sheet into the preheated oven and bake for 12-15 minutes, or until the biscuits are golden brown and the tops have a slight sheen. The edges should pull away from the parchment slightly, signaling a crisp crust. Keep an eye on them; oven temperatures can vary.
- Cool and Serve: Remove the biscuits from the oven and let them cool on a wire rack for 5 minutes. This resting period allows the butter to set and the biscuits to firm up. Serve warm, ideally with a pat of butter or a drizzle of honey for extra indulgence. The buttery swirl will look even more dramatic when the biscuits are still steaming.
That’s it — you did it. But hold on, I’ve got a few more tricks that will take this to another level and make your biscuits unforgettable.
Insider Tricks for Flawless Results
The Temperature Rule Nobody Follows
Many bakers think a lower oven temperature will give a better rise, but that’s a myth. A high, consistent heat of 425°F (220°C) is essential for a crisp crust and a tender interior. I’ve tested this with a thermometer; a slight dip of 10°F won’t hurt, but a drop of 30°F can ruin the texture. Keep your oven calibrated and preheat for at least 15 minutes before baking.
Why Your Nose Knows Best
The smell of butter melting in the oven is a universal signal that the biscuits are ready. If you hear a faint, sweet aroma, it’s time to check. A strong, buttery scent means the crust is forming; a faint scent means you need a few more minutes. Trust your nose, and you’ll never overbake or underbake again.
The 5-Minute Rest That Changes Everything
After removing the biscuits from the oven, let them rest for exactly five minutes. This short pause allows the steam inside to settle, preventing soggy bottoms. I’ve tried cutting them off immediately, and the biscuits felt raw. The rest period also lets the butter glaze set, giving that glossy finish you’ll love.
Keep the Butter Cold
If you find the melted butter hard to brush onto the biscuits, chill it in the fridge for a few minutes. Cold butter is easier to spread and won’t pool on the surface. Just remember to let it soften slightly before using, or you’ll end up with uneven glaze. This trick is especially useful on hot days.
Avoiding the Crumb Problem
A common mistake is letting the dough sit too long before baking. The dough can absorb moisture from the air, making it sticky and hard to shape. Work quickly after mixing, and if you need to pause, refrigerate the dough for no more than 10 minutes. This keeps the biscuits light and airy.
Creative Twists and Variations
This recipe is a playground. Here are some of my favorite ways to switch things up:
Savory Herb Infusion
Add 2 teaspoons of dried thyme or rosemary to the dry mix for a fragrant, herbaceous twist. The herbs pair beautifully with the buttery glaze and add a subtle depth of flavor. Serve with a side of scrambled eggs for a hearty breakfast.
Cheesy Delight
Fold in 1 cup of shredded cheddar before shaping the dough. The cheese melts into pockets of gooey goodness, creating a savory bite that’s perfect for brunch or a snack. The butter glaze still shines through, giving a golden finish.
Cinnamon Sweetness
Stir 1 teaspoon of ground cinnamon into the dry ingredients and replace the sugar with 2 tablespoons of brown sugar. The warm spice complements the butter, turning the biscuits into a comforting treat. Pair with a drizzle of maple syrup for an extra sweet finish.
Chocolate Chip Surprise
Drop in ½ cup of dark chocolate chips just before baking. The chips melt into pockets of chocolate, creating a decadent bite that’s a hit with kids and adults alike. The butter glaze adds a silky finish that balances the richness.
Gluten-Free Version
Replace the all-purpose flour with a 1:1 gluten-free blend, and add 1 tablespoon of xanthan gum for structure. The biscuits will still rise and stay fluffy, though the texture will be slightly denser. This variation allows everyone to enjoy the buttery swim.
Storing and Bringing It Back to Life
Fridge Storage
Cool the biscuits completely, then store them in an airtight container at room temperature for up to 2 days. The butter glaze will remain firm, but the biscuits will retain their moisture thanks to the airtight seal. When ready to serve, reheat in a 350°F oven for 5 minutes.
Freezer Friendly
Place the cooled biscuits on a baking sheet in a single layer and freeze until solid. Once frozen, transfer them to a freezer bag. They can stay in the freezer for up to 3 months. Thaw at room temperature before reheating to preserve the buttery sheen.
Best Reheating Method
Preheat your oven to 350°F (175°C). Place the biscuits on a baking sheet and bake for 5-7 minutes, or until they’re warm and the butter glaze is glossy again. Add a tiny splash of water to the pan before reheating to steam the biscuits back to perfection; this keeps the crust from drying out.