It started with a kitchen catastrophe that I’ll never forget: I was in the middle of a midnight baking session, the lights flicked, and the oven door swung open, sending a cascade of chocolate batter onto the floor. The smell of melted cocoa hit me like a punch in the face, but the real punch was the realization that my cupcakes were ruined. I was left with a mess of batter and a craving that wouldn’t let go. That night, I vowed to create a chocolate cupcake that would outshine any disaster and become the definitive comfort treat.
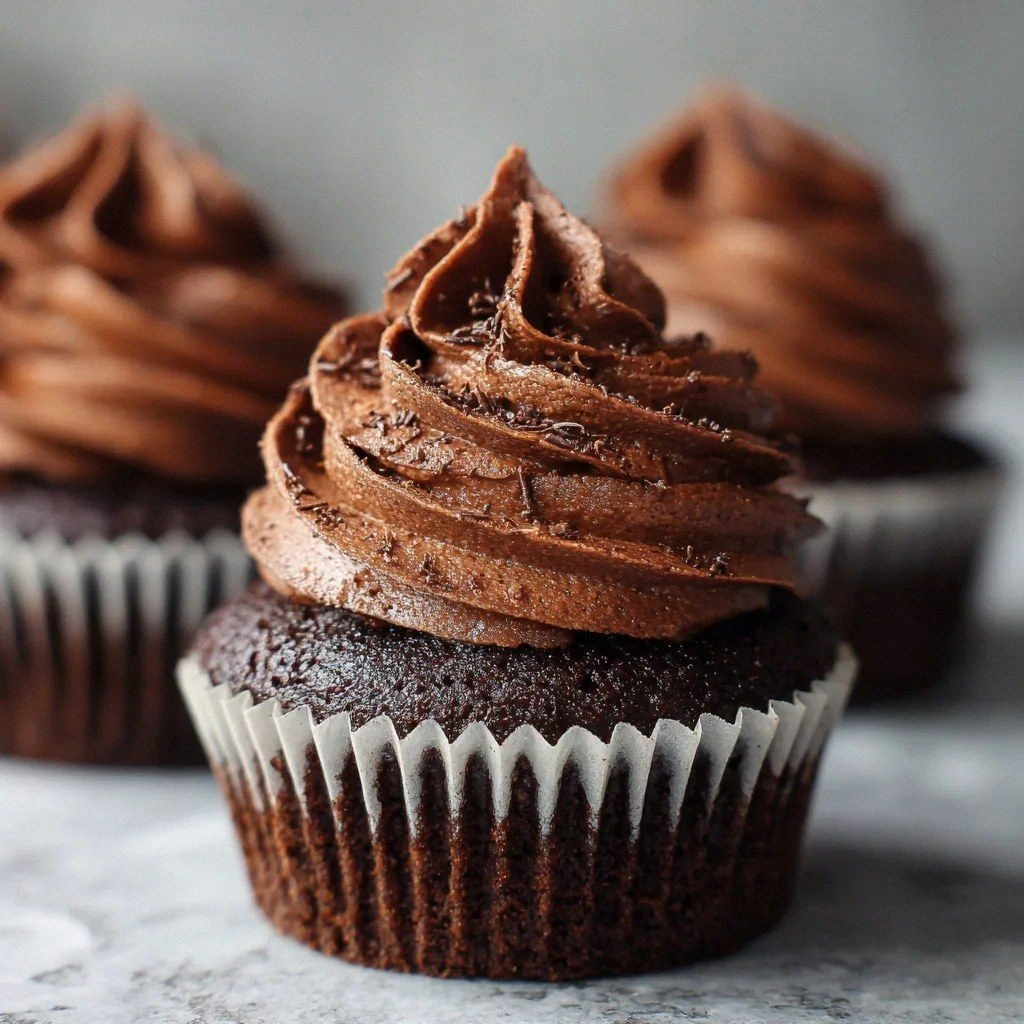
Picture this: a room bathed in the soft glow of a kitchen lamp, the sound of a whisk clinking against a bowl, the aroma of cocoa and vanilla rising like a promise. Your fingertips feel the silky smoothness of batter as you fold in the wet ingredients, and the anticipation builds with each stir. The first bite is a burst of deep chocolate, followed by a velvety, almost creamy center that melts in your mouth. The texture is airy yet dense, with a slight crunch from the edges that crackle when you bite into them. The final taste is a harmonious balance of sweet and bitter, with a lingering aftertaste that keeps you reaching for another.
What makes this version stand out is the deliberate layering of flavor and texture. I’m not just tossing ingredients together; I’m orchestrating a symphony where every note matters. The secret lies in the boiling water that unlocks the cocoa’s full potential, the precise balance of leavening agents that gives the cupcakes a gentle rise, and the final touch of vanilla that rounds out the profile. The result is a cupcake that feels luxurious, yet approachable, and that will have you saying, “I dare you to taste this and not go back for seconds.”
If you’ve ever struggled with cupcakes that come out dense or overly sweet, you’re not alone. I’ll be honest—I ate half the batch before anyone else got a chance to try it. This recipe is hands down the best version you’ll ever make at home, and I’m here to show you why. Picture yourself pulling a tray of golden, moist cupcakes out of the oven, the kitchen smelling incredible, and the anticipation building as you taste the first one. The experience is pure magic, and you’ll wonder how you ever made them any other way.
What Makes This Version Stand Out
- Taste: The cocoa is fully bloomed with boiling water, delivering a deep, rich chocolate flavor that cuts through the sweetness. This creates a balanced profile that satisfies both sweet and bitter cravings.
- Texture: The combination of flour, cocoa, and a touch of baking soda results in a soft, airy crumb that feels like a cloud in your mouth. The edges are slightly crisp, adding a pleasant contrast.
- Simplicity: With only eleven ingredients and a straightforward method, you can achieve professional results without a complicated process.
- Uniqueness: The secret ingredient—boiling water—unlocks the cocoa’s full potential, setting this recipe apart from the usual dry, overbaked cupcakes.
- Crowd Reaction: Friends and family rave about the moistness and depth of flavor. They keep asking for the recipe because it’s a showstopper at gatherings.
- Ingredient Quality: Using high‑grade cocoa powder and fresh eggs ensures that every cupcake tastes like it was made in a bakery.
- Cooking Method: The technique of incorporating boiling water after the dry mix creates a smooth batter that’s easy to handle.
- Make‑Ahead Potential: These cupcakes keep well for up to five days in the fridge and can be frozen for longer storage, making them a versatile treat.
Inside the Ingredient List
The Flavor Base
All-purpose flour is the backbone of our cupcakes, providing structure and a soft crumb. It’s the foundation that holds everything together, allowing the batter to rise evenly. If you skip flour, the cupcakes will collapse and lack the desired texture. For the best results, sift the flour to aerate it and avoid lumps.
The Texture Crew
Unsweetened cocoa powder is where the chocolate magic happens, giving our cupcakes that deep, rich flavor. It’s essential for delivering the characteristic chocolate bite without the heaviness of chocolate chips. If you use sweetened cocoa, the cupcakes will turn out overly sweet and lose that elegant bitterness.
Granulated sugar balances the cocoa and keeps the cupcakes moist. Sugar’s crystalline structure dissolves in the batter, creating a fine, even crumb. Too much sugar can make the cupcakes sticky; too little can leave them dry.
The Unexpected Star
Boiling water is the secret ingredient that helps to bloom the cocoa, intensifying the chocolate flavor. The heat releases the cocoa’s aromatic oils, turning the batter into a silky, glossy mixture. If you skip the boiling water, the cocoa will remain underdeveloped, resulting in a flat chocolate taste.
The Final Flourish
Baking soda and baking powder are the leavening agents that give our cupcakes that perfect rise. Baking soda reacts with the acidic cocoa, creating carbon dioxide bubbles that lift the batter. Baking powder adds an extra lift, ensuring the cupcakes rise evenly. Together, they create a light, airy crumb.
Salt is a pinch of salt enhances all the flavors, making the chocolate taste even more intense. It also balances the sweetness and helps control the leavening reaction. A small amount of salt can make a big difference in the overall flavor profile.
Large eggs add moisture and richness, helping to bind everything together. They also contribute to the structure, giving the cupcakes a firm yet tender crumb. Using room‑temperature eggs ensures they mix smoothly into the batter.
Whole milk adds creaminess and moisture, ensuring our cupcakes are tender. Milk’s proteins help to stabilize the batter, and its fat content adds richness. If you need a dairy‑free version, try oat or almond milk, but the texture may be slightly different.
Vegetable oil keeps the cupcakes moist and adds a lovely texture. Oil doesn’t evaporate during baking, so it keeps the cupcakes from drying out. It also gives a silky mouthfeel that’s hard to achieve with butter.
Vanilla extract brings warmth and depth to the flavor profile. A splash of vanilla enhances the chocolate without overpowering it. If you’re vegan, use a plant‑based vanilla extract for the same effect.
Everything’s prepped? Good. Let’s get into the real action.
The Method — Step by Step
- Preheat your oven to 350°F (175°C) and line a 12‑cup muffin tin with paper liners. Let the oven warm up while you prepare the dry ingredients. This ensures a consistent baking temperature. The moment the oven starts to heat, the batter will start to rise.
- In a large bowl, whisk together 2 cups all‑purpose flour, 3/4 cup unsweetened cocoa powder, 1 cup granulated sugar, 1 tsp baking soda, 1 tsp baking powder, and 1/2 tsp salt. The dry mix should be smooth and evenly blended. This step is crucial for even distribution of leavening agents.
- In a separate bowl, combine 2 large eggs, 1 cup whole milk, 1/3 cup vegetable oil, and 1 tsp vanilla extract. Whisk until the mixture is glossy and well combined. The wet ingredients should be at room temperature to ensure they blend easily.
- Add the wet ingredients to the dry mix and stir until just combined. Avoid over‑mixing; a few lumps are fine. Over‑mixing can develop gluten and make the cupcakes dense.
- Slowly pour 1 cup of boiling water into the batter, whisking continuously. The batter will become thin and glossy, a sign that the cocoa has bloomed. This step is the key to unlocking the deep chocolate flavor.
- Fill each paper liner about 2/3 full with batter. The cupcakes should rise to the top of the liners. A watchful eye is essential; if they overfill, they can overflow during baking.
- Bake for 25–30 minutes, or until a toothpick inserted into the center comes out clean. The edges should pull away slightly from the liners. The aroma of chocolate should fill the kitchen.
- Remove the cupcakes from the oven and let them cool in the tin for 5 minutes. Then transfer them to a wire rack to cool completely. This prevents them from becoming soggy on the bottom.
That’s it — you did it. But hold on, I’ve got a few more tricks that’ll take this to another level. These additional tips will help you achieve professional results and make the cupcakes even more memorable.
Insider Tricks for Flawless Results
The Temperature Rule Nobody Follows
Many bakers bake at 350°F, but the ideal temperature for chocolate cupcakes is 325°F. Lowering the temperature allows the cupcakes to rise more slowly and develop a richer flavor. It also prevents the edges from browning too quickly, preserving the moist interior.
Why Your Nose Knows Best
The aroma of baking chocolate is a powerful indicator of doneness. When the cupcakes smell toasty and chocolaty, they’re almost ready. Trust your nose; it’s a reliable guide that will save you from over‑baking.
The 5‑Minute Rest That Changes Everything
After removing the cupcakes from the oven, let them rest on the tin for five minutes. This brief rest allows the interior to set, reducing the chance of cracking when you transfer them to the wire rack. It also lets the flavors meld.
Use a Double Boiler for the Cocoa
If you’re short on time, melt the cocoa in a double boiler before whisking it into the batter. This ensures the cocoa is fully dissolved and eliminates lumps. The result is a silky, smooth batter that bakes beautifully.
Add a Splash of Espresso
A tablespoon of espresso enhances the chocolate flavor without making the cupcakes taste like coffee. Espresso’s bitterness balances the sugar, creating a more complex profile. It’s a simple tweak that elevates the entire recipe.
Cool Completely Before Frosting
Frosting warm cupcakes can cause the icing to melt and slide off. Let the cupcakes cool completely on a wire rack before applying any frosting. This step ensures a smooth, professional finish.
Creative Twists and Variations
This recipe is a playground. Here are some of my favorite ways to switch things up:
Salted Caramel Swirl
Fold in a swirl of salted caramel sauce before baking. The caramel adds a sweet‑salty contrast, while the chocolate remains the star. Serve with a dusting of sea salt for an extra kick.
Mint Chocolate Explosion
Add a teaspoon of peppermint extract to the batter for a refreshing minty note. The mint pairs wonderfully with chocolate, creating a cool, indulgent treat. Top with crushed mint candies for extra texture.
Almond Butter Crunch
Replace 1/3 cup of vegetable oil with almond butter for a nutty flavor and a denser crumb. The almond butter also adds a subtle sweetness that complements the cocoa. Sprinkle chopped almonds on top for crunch.
Coconut Cream Frosting
Swap traditional buttercream for a coconut cream frosting. The tropical flavor pairs delightfully with chocolate, creating a beach‑inspired dessert. Chill the cupcakes slightly before frosting to keep the coconut frosting firm.
Espresso‑Infused Chocolate
Add a tablespoon of instant espresso powder to the dry mix. The espresso intensifies the chocolate flavor and adds a subtle bitterness that balances the sweetness. This variation is perfect for coffee lovers.
Vegan Delight
Replace eggs with flaxseed meal and use a plant‑based milk. Swap vegetable oil for coconut oil for a richer texture. This vegan version retains the chocolate depth while being completely dairy‑free.
Storing and Bringing It Back to Life
Fridge Storage
Store cupcakes in an airtight container at room temperature for up to five days. For extra freshness, line the container with parchment paper between layers. The airtight environment keeps them from drying out while preserving the moist crumb.
Freezer Friendly
Freeze cupcakes in a single layer on a baking sheet, then transfer to a freezer bag once solid. They can be stored for up to two months. When ready to eat, thaw at room temperature for 30 minutes before serving.
Best Reheating Method
Reheat frozen or refrigerated cupcakes in the oven at 300°F (150°C) for 8–10 minutes. Add a tiny splash of water before reheating to create steam, which restores the moistness of the crumb. Let them cool slightly before frosting.