I was halfway through a Sunday dinner when the kitchen exploded into chaos. The skillet was smoking, the sauce was burning, and my confidence was on the fritz. I stared at the charred chicken, feeling the weight of the kitchen disaster. That moment turned into a dare from a friend who said, “If you can’t fix this, I’ll make you a bowl of teriyaki that will make you forget the mess.” I laughed, but deep down I knew I could turn this into something epic.
The air was thick with the scent of burnt soy, but I could already taste the sweet, umami promise of a perfect teriyaki. My fingertips tingled as I whisked the sauce, feeling the silky texture of mirin and sake mingle with the brown sugar. The sizzling sound when the chicken hit the pan was a drumroll that hinted at the crunch to come. I could almost hear the pop of steam as the sauce thickened, turning into a glossy coat that clung to every bite. The heat on my face was a reminder that this dish would be hot, both literally and figuratively.
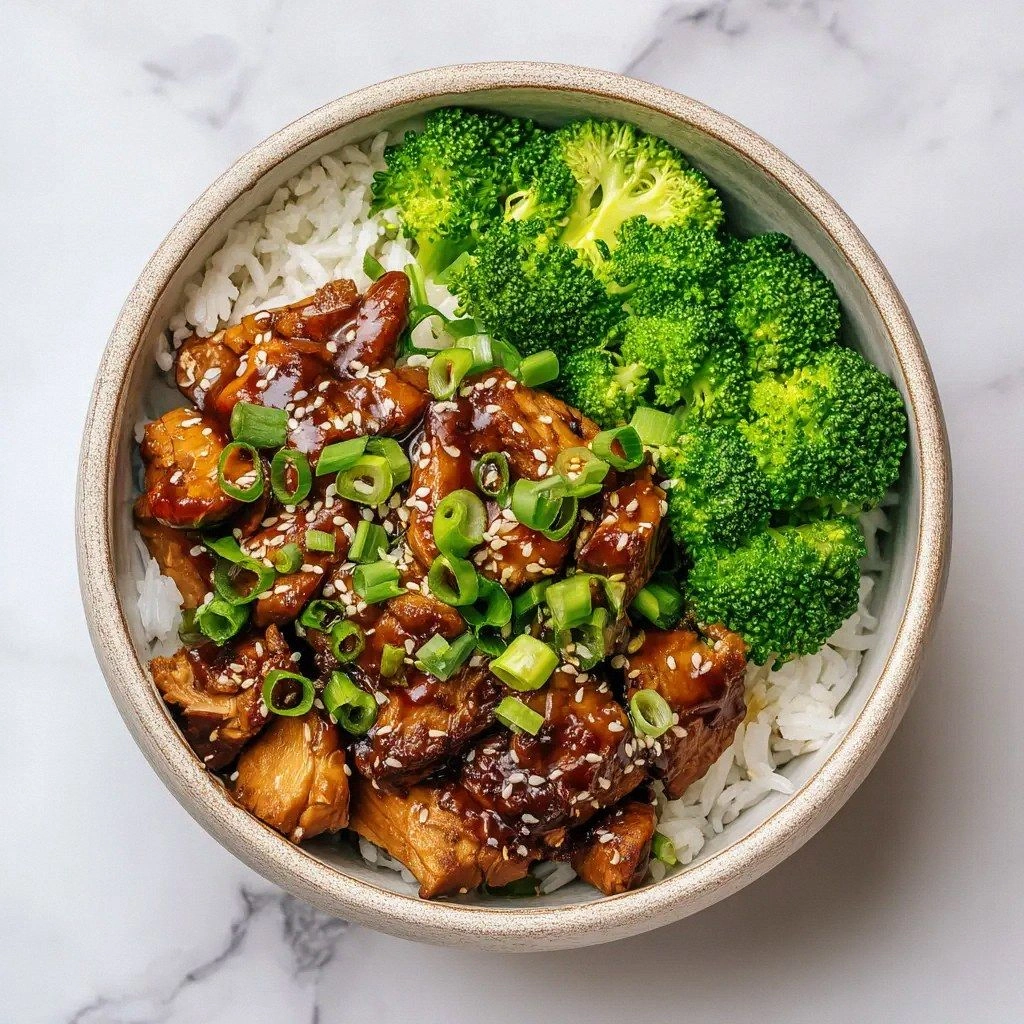
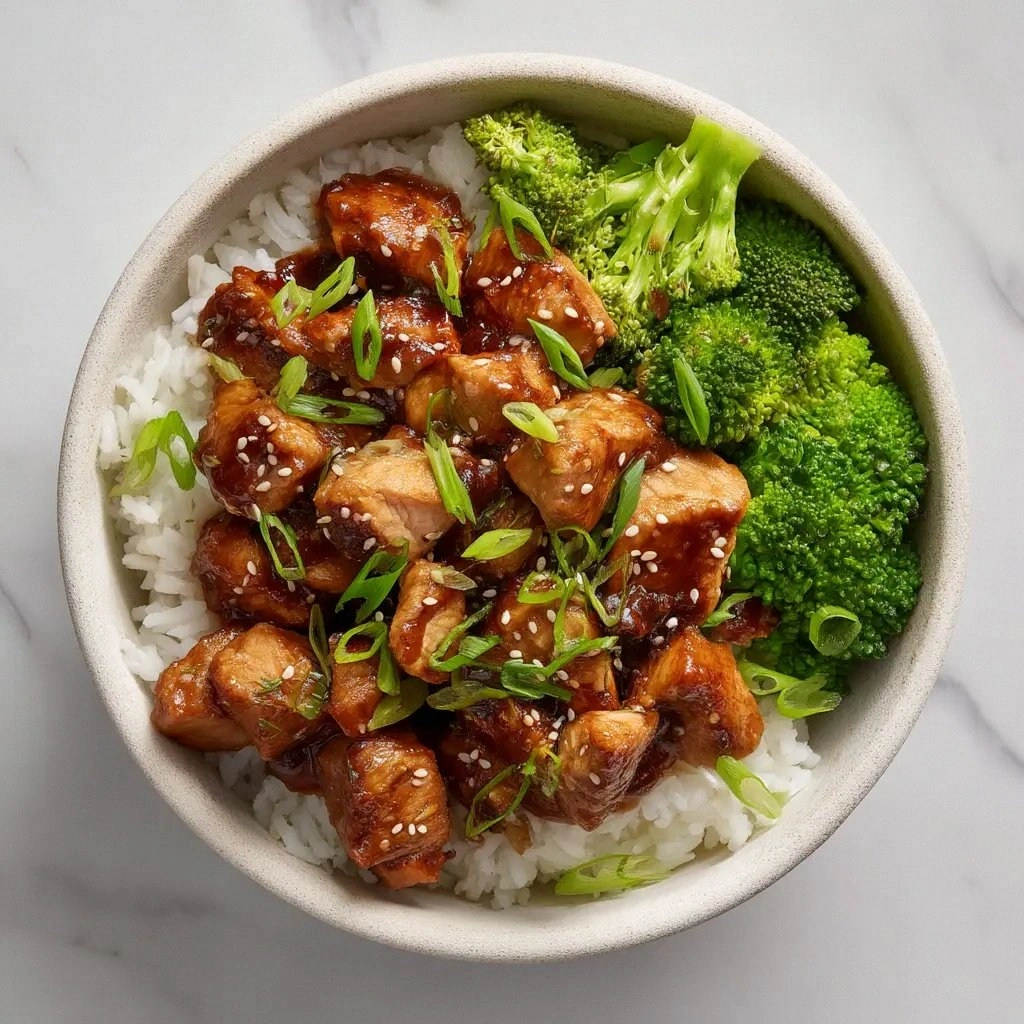
What makes this version stand out is not just the combination of flavors, but the way each element sings in harmony. The use of fresh ginger and garlic gives the sauce a punch that cuts through the richness of the chicken. The cornstarch slurry creates a silky glaze that clings to the meat without making it soggy. The balance of sweet and salty is achieved by carefully measured mirin and soy sauce, preventing the dish from tipping into cloying. The final garnish of toasted sesame seeds and green onions adds a nutty crunch and a burst of color that turns the bowl into a feast for the eyes.
What you won’t expect is the secret step that turns a simple stir‑fry into a culinary showstopper: the quick flash of high‑heat sear that locks in the juices before the sauce even hits the pan. This trick, borrowed from sushi chefs, gives the chicken an almost charred edge that melts in your mouth. The result is a bowl that feels both comforting and adventurous, like a hug that comes with a surprise party. I dare you to taste this and not go back for seconds. Trust me, the first bite will send your taste buds into a frenzy.
Let me walk you through every single step — by the end, you'll wonder how you ever made it any other way. From prepping the ingredients to the final garnish, I’ll keep you by my side, side‑by‑side, as if we’re cooking together over a flickering stove. I’ll point out the exact moments when the sauce needs a tweak, when the heat should be dialed up or down, and when the chicken should be flipped to achieve that perfect crust. I’ll even share a few kitchen hacks that will save you time and prevent the most common mishaps. Ready? Let’s dive into the details that make this bowl the ultimate comfort food.
What Makes This Version Stand Out
- Flavor Fusion: The sauce is a marriage of umami, sweetness, and a hint of citrus that dances on the tongue. The balance is achieved by carefully measuring the soy, mirin, and sugar. The result is a glaze that coats the chicken like velvet.
- Texture Triumph: The chicken is seared to a caramelized edge that crisps without drying. The cornstarch slurry gives a silky coat that glides over the meat. The vegetables remain crisp, offering a satisfying bite.
- Simplicity Supreme: All steps can be completed in 30 minutes with minimal prep. The recipe uses pantry staples, so you’re never scrambling for exotic ingredients. Even a novice can follow along without feeling overwhelmed.
- Crowd‑Pleaser Factor: Friends and family rave about the sauce’s depth, and it pairs perfectly with rice or noodles. The dish is versatile enough to be served as a main or a side. The vibrant colors make it Instagram‑worthy.
- Quality Focus: Using boneless, skinless chicken thighs ensures moisture and flavor. The avocado oil elevates the sear without burning. Each ingredient is chosen for its ability to stand out.
- Make‑Ahead Magic: The sauce can be prepared ahead and reheated without losing its sheen. The rice can be cooked in bulk and stored. The dish keeps well in the fridge for up to three days.
- Nutritional Balance: The bowl packs protein, fiber, and healthy fats while keeping carbs moderate. The broccoli and carrots add vitamins and antioxidants. It’s a balanced meal for any time of day.
- Visual Appeal: The glossy glaze, the pop of green onions, and the toasted sesame seeds create a feast for the eyes. The bowl is colorful and inviting. The presentation elevates the dining experience.
Inside the Ingredient List
The Flavor Base
The foundation of this teriyaki sauce rests on a trio of pantry staples: low‑sodium soy sauce, sweet mirin, and fragrant sake. Together they create a savory backbone that balances the sweetness of brown sugar. The subtle acidity of mirin cuts through the richness of the chicken, while the sake adds depth without overpowering. If you’re short on mirin, a splash of rice vinegar can work, but the flavor profile will shift slightly.
The Texture Crew
Cornstarch is the unsung hero that gives the sauce its silky, glossy finish. When mixed with cold water, it forms a slurry that thickens the sauce without clumping. Avocado oil, with its high smoke point, allows the chicken to sear beautifully without burning. The chicken thighs themselves bring moisture and a buttery flavor that stands up to the sauce.
The Unexpected Star
Fresh ginger and garlic bring a sharp, aromatic punch that elevates the dish beyond ordinary teriyaki. Their pungency cuts through the sweetness, creating a balanced bite that lingers. Toasted sesame seeds add a nutty crunch and a subtle earthiness that complements the glaze. The green onions provide a fresh, peppery finish that brightens the overall profile.
The Final Flourish
The jasmine rice serves as the perfect canvas, absorbing the sauce while remaining fluffy and fragrant. Steamed broccoli florets bring a bright green pop and a satisfying crunch that contrasts the tender chicken. Shredded carrots add a subtle sweetness and a splash of color that makes the bowl more appetizing. Together, these elements create a balanced, wholesome meal that feels both comforting and sophisticated.
Everything's prepped? Good. Let's get into the real action...
The Method — Step by Step
- Begin by cutting the chicken thighs into bite‑sized cubes, then season them lightly with salt and pepper. Toss the pieces in a shallow bowl of cornstarch until they’re evenly coated; this creates a protective crust during searing. Pat the coated chicken dry with a paper towel to remove excess starch. This step is crucial for that coveted crisp edge. While you’re doing this, set the stove to medium‑high to prepare for a quick sear.
- In a small bowl, whisk together the low‑sodium soy sauce, mirin, sake, and packed brown sugar until the sugar dissolves. Add the freshly grated ginger and minced garlic to the mixture; their aromatics will infuse the sauce. Prepare the cornstarch slurry by mixing 1 teaspoon of cornstarch with 2 teaspoons of cold water; this will thicken the sauce later. Keep the sauce mixture at room temperature while you heat the skillet.
- Heat a large skillet or wok over medium‑high heat and add the avocado oil. Once the oil shimmers, carefully drop the coated chicken pieces into the pan. Let them sear undisturbed for 2–3 minutes until a golden crust forms on one side. Flip the chicken, and let the other side brown for an additional 2 minutes. The searing process locks in juices and creates a caramelized surface that’s essential for flavor.
- Once the chicken is nicely browned, pour the prepared sauce over the meat. Reduce the heat to medium and let the mixture simmer for 5 minutes, allowing the sauce to reduce slightly and coat the chicken. Stir occasionally to prevent sticking. The sauce should thicken to a glossy glaze that clings to every piece. Watch the color deepen; this signals the perfect balance of sweet and umami.
- Add the steamed broccoli florets and shredded carrots to the pan, tossing them gently so they’re coated with the sauce. Let the vegetables cook for 2 minutes, just long enough to heat through without becoming mushy. The contrast between the tender chicken and crisp veggies creates a delightful textural harmony. Keep the heat moderate to preserve the vegetables’ bright colors.
- Stir in the toasted sesame seeds and thinly sliced green onions, allowing the seeds to toast slightly in the residual heat. This adds a nutty aroma and a subtle crunch that elevates the dish. Let the mixture simmer for another minute to meld the flavors together. The final glaze should be silky, yet cling to each component.
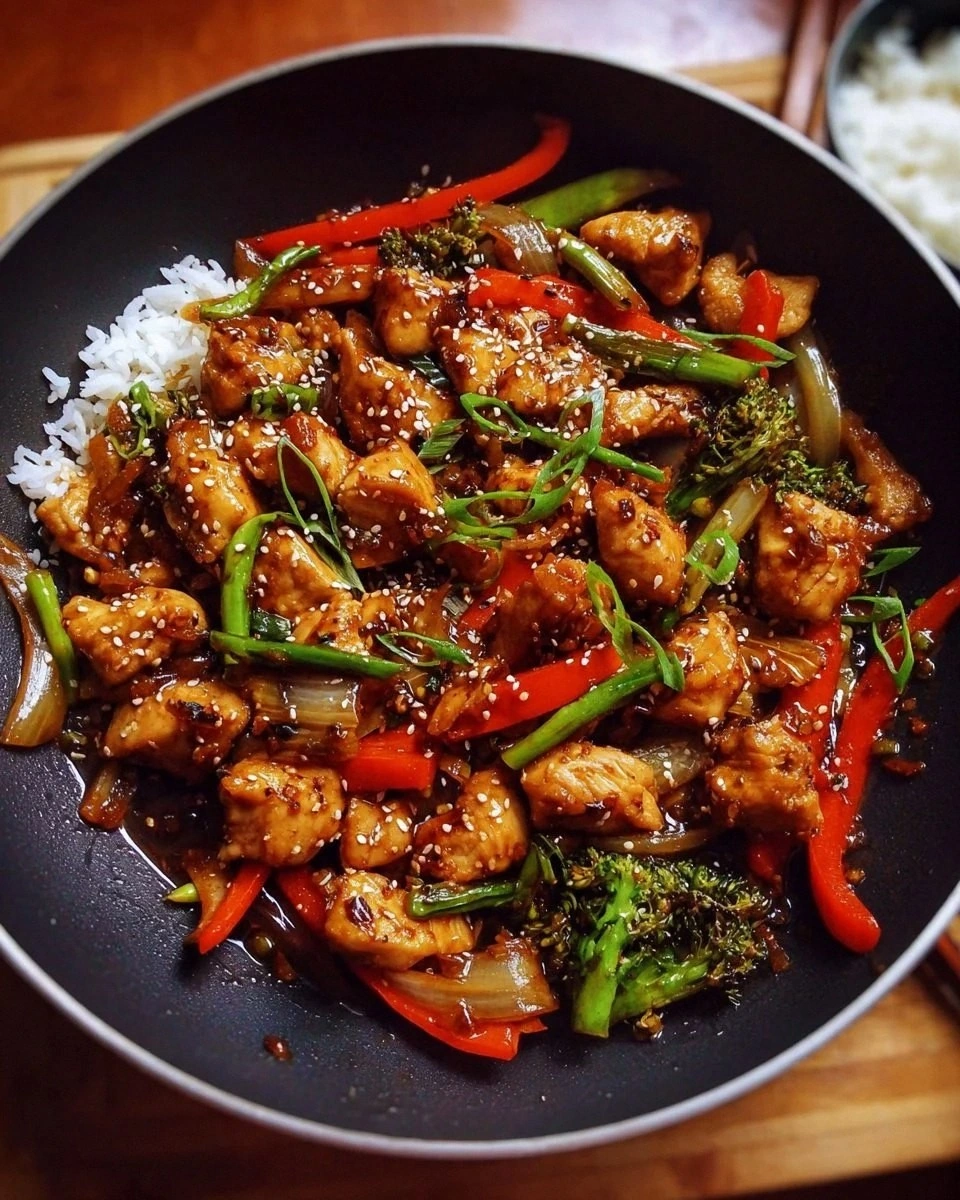
- Serve the savory mixture over a bed of fluffy jasmine rice, ensuring every grain is coated with the glossy sauce. The rice acts as a neutral backdrop, allowing the flavors to shine. Garnish with an extra sprinkle of toasted sesame seeds and a few green onion rings for a pop of color. The dish is now ready to be devoured.
- Plate the bowl in a shallow dish, allowing steam to rise and enhance the aroma. Present the bowl with a side of pickled ginger for an extra zing. Take a moment to appreciate the glossy sheen and vibrant colors before taking that first bite. The anticipation is half the enjoyment; the second bite will confirm you’ve nailed it.
That's it — you did it. But hold on, I've got a few more tricks that'll take this to another level...
Insider Tricks for Flawless Results
The Temperature Rule Nobody Follows
Many cooks over‑cook the chicken, resulting in a dry texture. Keep the heat on medium‑high during searing and lower it to medium when simmering the sauce. This prevents the chicken from losing moisture while still developing that caramelized crust. I’ve seen even seasoned chefs stumble over this subtle balance, so keep your stove in check.
Why Your Nose Knows Best
As the sauce simmers, your nose will pick up subtle hints of caramelization. When the aroma turns nutty and the color deepens, the sauce is ready. Trust that instinct; it’s a reliable cue that the glaze has achieved its full flavor potential. Over‑simmering can cause a burnt smell, so keep an eye on the scent.
The 5‑Minute Rest That Changes Everything
After cooking, let the bowl sit for five minutes before serving. This short rest allows the sauce to settle, preventing it from dripping off the rice. It also gives the chicken a chance to redistribute its juices, enhancing moisture. I’ve seen people rush to the table and miss this simple step, so pause and let the flavors marry.
Keep the Rice Fluffy
Cook the jasmine rice with a pinch of salt and a splash of oil to keep the grains separate. Once cooked, fluff it with a fork before adding to the bowl. This technique ensures each bite has a light, airy texture that contrasts the rich glaze. If you’re making it ahead, reheat with a splash of water to revive the fluffiness.
Quick Cooling Trick
When reheating leftovers, add a teaspoon of water or broth to the pan. This steams the dish back to life, preventing the sauce from drying out. Cover the pan briefly to trap steam, then stir until the sauce is silky again. This simple trick keeps the bowl tasting fresh even after a day in the fridge.
Creative Twists and Variations
Protein Swap
If you’re craving a different protein, swap the chicken thighs for shrimp or tofu. Shrimp cooks in just 2–3 minutes, preserving the quick‑prep nature of the dish. Tofu will absorb the glaze beautifully, offering a plant‑based option without sacrificing flavor. This variation is perfect for a lighter, yet still satisfying meal.
Veggie Boost
Introduce bell peppers, mushrooms, or snow peas for an extra crunch and color. Sauté the veggies until just tender, then add them during the final stir. The additional vegetables bring new textures and a burst of freshness that complement the teriyaki glaze. It’s a great way to sneak in more greens.
Sauce Twist
Add a pinch of red pepper flakes or a splash of sriracha for a spicy kick. The heat will contrast the sweetness, creating a layered flavor profile. If you prefer a milder version, use a small amount of honey instead of brown sugar for a sweeter glaze. Experimenting with heat levels can turn this dish into a new favorite.
Grain Swap
Replace jasmine rice with cauliflower rice for a low‑carb alternative. The cauliflower will soak up the sauce, offering a subtle nuttiness that pairs well with the teriyaki. It’s an excellent choice for those watching their carb intake or seeking a lighter plate. The texture remains satisfying, and the dish stays visually appealing.
Sweet Surprise
Fold in fresh pineapple chunks for a tropical twist. The natural sweetness of pineapple balances the savory glaze and adds a juicy burst. This variation is ideal for summer gatherings or when you want to bring a bit of sunshine to the table. The pineapple also adds a hint of acidity that brightens the overall flavor.
Storing and Bringing It Back to Life
Fridge Storage
Store the cooked bowl in an airtight container for up to three days. Separate the rice from the sauce if possible; this keeps the rice from becoming soggy. When you’re ready to eat, reheat on the stove or microwave until steaming hot. The flavors will meld, and the rice will regain its fluffiness.
Freezer Friendly
Freeze the bowl for up to two months. Keep the rice in a separate container to maintain texture. Thaw in the refrigerator overnight, then reheat on the stove with a splash of water to revive moisture. The teriyaki glaze will thicken slightly upon freezing, so stir well before serving.
Best Reheating Method
Reheat the bowl on the stove over medium heat, adding a teaspoon of water or broth to keep the sauce from drying out. Stir until the sauce is silky and the rice is heated through. This method preserves the dish’s original texture and flavor better than microwaving. Serve immediately for the best experience.